Sierra escapes is arguably the most luxury and private accommodation in New South Wales, and very accessible as a weekend trip from Sydney,
After 8 weekend trips to Mudgee from Sydney over the last few years, I now feel like a bit of an expert about the Mudgee area from a visitor’s perspective. We have now stayed in many different accommodations available, the most recent being the beautiful, secluded Sierra Escapes.
Staying in Sierra Escapes is one of the more expensive options in Mudgee and could be the perfect excuse for a celebration! It’s a great option for an anniversary, proposal, birthday or Babymoon.
Choices of accommodation at Sierra Escapes
Sierra Escapes started off in the luxury tent sector, winning many awards for the their stunning glamping style accommodation. These tents are an excellent choice of accommodation for those who want an inside/outside experience but still with a touch of luxury.
We opted to stay in the tiny house named Elouera. This accommodation is out of this world! We felt very lucky to be staying here for our Babymoon. From the floor-to-ceiling glass windows in the lounge and bedroom to the excellent cooking facilities, not one other building in sight from the house…it’s just wow! The view has to be one of the best countryside views in New South Wales.
Have the perfect weekend at Sierra Escapes
If this is your first time to Mudgee then you must do a wine tour as part of your visit. In this case staying 3 nights would be worthwhile. This would allow you to divide your time between the beautiful accommodation and seeing the best of Mudgee wineries.
As we had been to Mudgee before quite a few times, then as soon as we arrived at the accommodation we did not plan to leave. If you also plan the same for your getaway in Sierra Escapes, then I recommend to go to the shop first to buy enough food to last the entire stay.
Here are some ideas of how to spend your time in the most stunning and luxury accommodation in Mudgee:
Spend the afternoon having a refreshing swim in the magnificent lap pool!
Relax outside with an evening drink while watching the kangaroos gracefully roam in the billabong from the cozy Tiny House.
Ignite the fire at sunset for an absolutely stunning view that will fill your heart with joy.
Relish delightful breakfasts on the outside decking while basking in the beautiful view.
Enjoy a delightful outdoor bath while watching the stunning sunset.
Immerse yourself in a captivating book in the lounge while the floor-to-ceiling glass presents breathtaking views all around!
Enjoy a magical night of star gazing and marvel at the beauty of the Milky Way!
Book Stephanie, the Sierra Escapes partner photographer if you are celebrating something extra special.
Start the morning opening the automatic curtains showing off the stunning misty morning sunset without evening needing to leave the comfy bed!
Getting to Sierra Escapes
Sierra Escapes is extremely remote with not many other buildings around (view from tiny house has no other buildings!). It is about a 20 minute drive from the middle of Mudgee. Although the website says that some people have shown up in expensive sport cars, after the experience of driving the rocky dirt tracks, I would highly recommend to not do this!
Getting up to the tiny house or tents requires some hilly suspension on your car, which is easy in a sensible car.
The perfect car to take to the accommodation is at least an SUV, in order to not have a very nervous drive up to the stay.
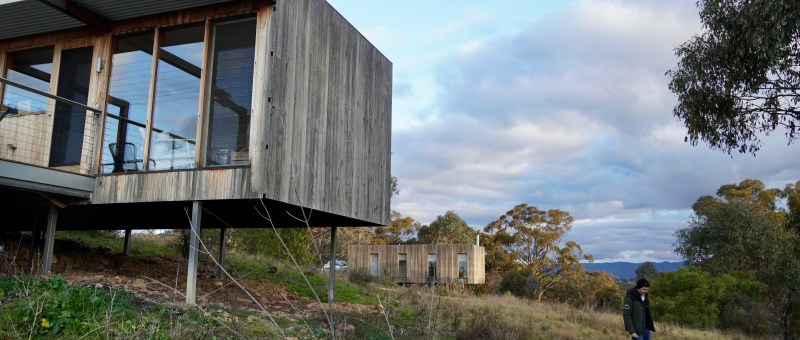
Sierra Escapes Tiny House Elouera in Pictures
A weekend in Sierra Escapes will be an unforgettable experience, and this enchanting place will forever hold a special spot in your heart.
The Best Bali itinerary: must do’s and less touristy places
This was our first trip to Bali, and we didn’t know when we would return. So, we wanted to see the top spots for the best Bali itinerary, including a less touristy area.
We decided to spend the first couple of days in Seminyak, then three nights in Ubud to explore the famous jungle, followed by a stay in Amed, which is much quieter and less touristy. Finally, we spent one night in Jindabyne to be near the airport before flying home.
Bali is easy to get around, so we used each area as a base to visit temples and beautiful sights, while also enjoying some relaxing days by the pool.
We flew to Bali on a Friday night (I think we arrived at 11pm!) and flew back out one week later on Sunday night. This meant we only needed to take 5 annual leave days off work, and got 9 amazing days in Bali!
Day1 – Seminyak (arrive late from flight)
Day2 – Seminyak
Day3 – Ubud
Day4 – Ubud
Day5 – Ubud
Day6 – Amed
Day7 – Amed
Day8 – Amed
Day9 – Jimbaran
Day10 – Jimbaran (fly home in evening)
Day 1-2: Seminyak
The first couple of days of our 9 amazing days in Bali itinerary, of course, begin with Seminyak! Seminyak was everything I heard it would be: streets full of vendors, tourist shops, Australian clothing stores, boutique shops, cool eateries, nice places to drink, and sports cafes. Make it whatever you like, but we actually loved our 2 days there and could have spent much more time exploring the beaches, cafes, and restaurants around.
Mobility:
We organised a taxi pick up which was included in our hotel stay by The Amala. They also had a free taxi for guests into the Seminyak centre and we used this service to get to get around in the evening.
Stay:
We stayed at the beautiful Amala hotel. A boutique quiet oasis of luxury rooms and pool villas in the middle of the busy town.
Highlights:
Drinking Bintang at Corner House (has to be done!)
Wondering down the main busy shopping street of Seminyak – Jalan Kayu Aya (for cafes, boutique clothes stalls, and anything!)
Amazing Potato Head Beach Club for very chilled pre-drinks and awesome sunset views
Sarong restaurant for dressing up, and insanely good asian cuisine.
Never ending breakfast in the beautiful setting of The Amala hotel.
Day 3-5: Ubud
Lush green rice paddies, beautiful mystic temples in jungles, Ubud is really the most magical place. We made sure to split our time between busy days seeing all of the amazing places, and chill time in the amazing hotel.
Mobility:
We hired a taxi (organised by The Amala hotel) who took us from Seminyak to Ubud, he was a super nice guy and even took us to the Luwak Coffee Plantation on the way for no extra charge.
Day tour – we hired a taxi recommended from a friend (we had organised this before we left Australia). All drivers tend to use what app and all it takes is a whatapp message to book. The taxi cost $60 AUD for the entire day (8 hours).
Out and about in Ubud we used Bluebird Taxi, which is the safest taxi to use for short trips (you can flag them down).
Stay:
After so much research, we decided to stay in Kamandalu Resort. We chose the Valley Pool Villa, and it was so amazing.
Not yet fully on the must go tourist route in Bali, Amed felt a world away from the touristy streets of Seminyak. Amed is on the East Coast of Bali. This area is brilliant for snorkelling in the corals, seeing volcanic black sand beaches, having a beer with a view of Mount Agung (still active volcano).
Stay:
We stayed at the Griya Villas which was an absolute dream. All villas have their own pool which have a view of the East Coast Ocean, wow! This is not a small plunge pool, this is a pool large enough to swim in! When we stayed the cost was around 300 AUD a night, which was amazing value for what it was (and also included breakfast and transport). Tip: make sure to order the floating breakfast for at least one morning, it will be a very memorable breakfast experience!!
Included in the hotel rate when booking directly on the website, there was free transport to and from the Griya Villas and airport. Luckily, as it was similar distance accepted to pick us up from our hotel in Ubud, and then when we left they dropped us off in Jimbaran. In fact on the way from Amed to Jimbaran there were a few temples we wanted to see in the area, and they allowed us to visit them on this journey for a very small cost.
Highlights:
Snorkelling at Lipah Beach
Outdoor cinema on Griya Villas rooftop
Happy hour at the Griya
Floating breakfast in the Pool Villa
Drinking beer watching the sunset with a view of Mount Agung
Day 9-10: Jimbaran
If you don’t have much time in Bali, Jimbaran seems like a great place to base yourself. Little beach town with easy access from the airport, and to places like Uluwatu, Seminyak etc.
Jimbaran has a beautiful beach and many hotels to chose from. We decided to stay here on our last night to be close to the airport and therefore to not have any panic about not being able to get our flight because of the Bali traffic!
Stay:
We chose to stay at the Intercontinental Hotel, Jimbaran. This is more of a resort than a hotel. The was very good value for money (I think we paid 200 AUD). It has a HUGE pool overlooking the beach, many restaurants to chose from on site and is in the centre of the Jimbaran beach area. When we entered it felt really like a luxury resort, a huge metal drum was played as we entered into the huge reception area. For a chain, they had really made sure they acknowledged the traditional Balinese style everywhere, some areas of the resort feeling like some of the temples we had visited.
This hotel allowed us to stay using their facilities until our flight in the evening. Therefore the day consisted of hanging around the pool and dining at their amazing Sunset Bar and Grill restaurant (where the fresh fish was delicious!).
If you’re looking for a perfect destination for your next Europe weekend trip, you should definitely visit Seville. Seville is hands down our favourite city in Spain. A visit to Seville has everything you would want from a Spanish city break – beautiful narrow streets to get lost in, stunning architecture, amazing hotels with rooftop swimming pools, endless amount of bars and restaurants filling out the stone cobbled streets.
Regarding the weather for the best months to visit Seville, luckily there is not too many choices of ‘bad times’ to go to Seville. When the rest of Europe has started to cool down in October, Seville is still hovering at a very pleasant mid-20s. Avoid August as this is too hot and actually considered ‘low season’ due to the unpleasant heat.
Here are Seville’s must-do’s
Visit Plaza de Espana
Absolutely stunning huge square, 15 minutes walk from the old town. The Plaza de Espana is usually the ‘profile photo’ of Seville, it is one of the most beautiful city squares in the world. When you visit Seville, spend hours here walking around, taking photos, and riding a gondola.
Alcazar of Seville
The alcazar of Seville is an incredible Moorish palace. You must go! Interesting fact: Games of Thrones used this palace for filming the Water Gardens of Dorne. A visit to this palace is a must when in Seville.
Casa de Pilatos
An excellent alternative if you didn’t quite manage to get the tickets for the Alcazar. Casa de Pilatos is a stunning palace with beautiful moorish architecture and well maintained gardens. Pre-booking is not necessary which makes it a perfect stop on a leisurely walk meandering around the old town streets.
Day trip to Cordoba
Cordoba is a great day trip from Seville if you have enough time and still want to see more after you visit Seville.
Get a direct train from Sevilla Santa Justa train station to Cordoba. The train, called AVANT, has tickets released roughly 2 months before. Highly recommend to pre-book as there is a chance the tickets will have sold out if you just turn up to the train station.
Tapas, wine and beer!
Need it be mentioned?! Find a good article on recommendations here. Tapas is a must-try when you visit Seville.
Get lost in the streets of Seville old town
Walking around Seville old town will give you the best experience of Seville. Head towards Barrio Santa Cruz to see the best of Seville!
In summary, wandering around the streets of Seville will be an experience in itself, coming across old churches, cute little bars and amazing bakeries. A visit to Seville’s old town is a highlight for many tourists.
Where to Stay in Seville
Hotels & Apartments
To be walkable to the sites and main area of old town of Seville, look at being less than 15 minute walk to the Seville Cathedral. Here are a list of suggestions for hotels / apartments in good location. All these hotels can also be found on hotels.com / booking.com.
South Island New Zealand Routeburn Track: The Divide to The Shelter in 3 Days
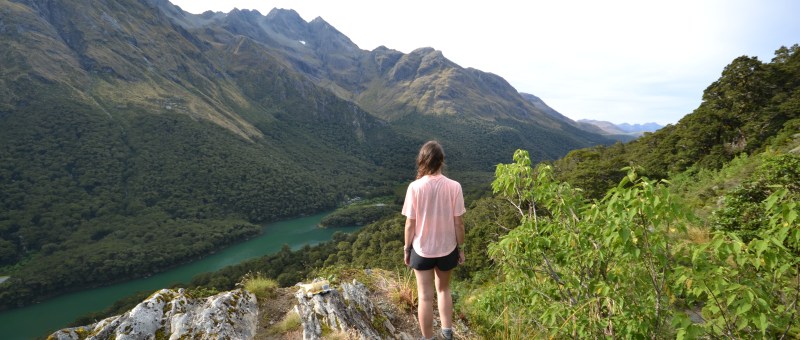
Walking past stunning waterfalls, amazing snow peak mountains, diamond shining lakes and enchanted forests, the Routeburn track is hands down the most beautiful multi-day trek I have ever done.
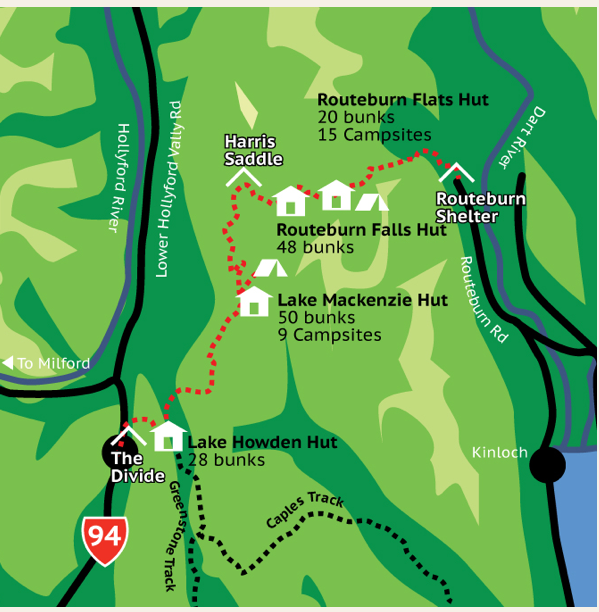
The Routeburn track is a one way 32km South New Zealand multi-day trek. It is within the stunning Fiordland & Mount Aspiring National Parks.
There are 3 popular multi-day treks in this area of New Zealand. These are the Routeburn, Milford and Kepler Track. The Milford trek is normally the most popular. This is due to its connection with Milford Sounds. It usually sells out quite fast. Both the Milford and Kepler treks are 4 days long, and the Routeburn is 3 days. This was one of the reasons we chose it. We were in South New Zealand on holiday. We still had many more areas we wanted to visit. However, for the pure beauty and variety of the trek, we are very glad with our decision.
The trek can be walked either way. The more popular way to walk the Routeburn track is from Glenorchy (Routeburn Shelter) to the Divide. However, we did it the other way, starting at the Divide and finishing at Routeburn Shelter. We did this so we could fit in a visit to Milford Sounds on day 1 of the trek. Keep reading for information on how to fit this in.
Everything you need to know about the Routeburn Track
When planning our Routeburn track, we wanted to make the most of going all the way to the divide. So we decided to do a Milford Sound Cruise before starting the trek. This made very good use of time. I would only recommend doing this in the summer months. You need daylight until late. Summer in South NZ is light until 10pm!
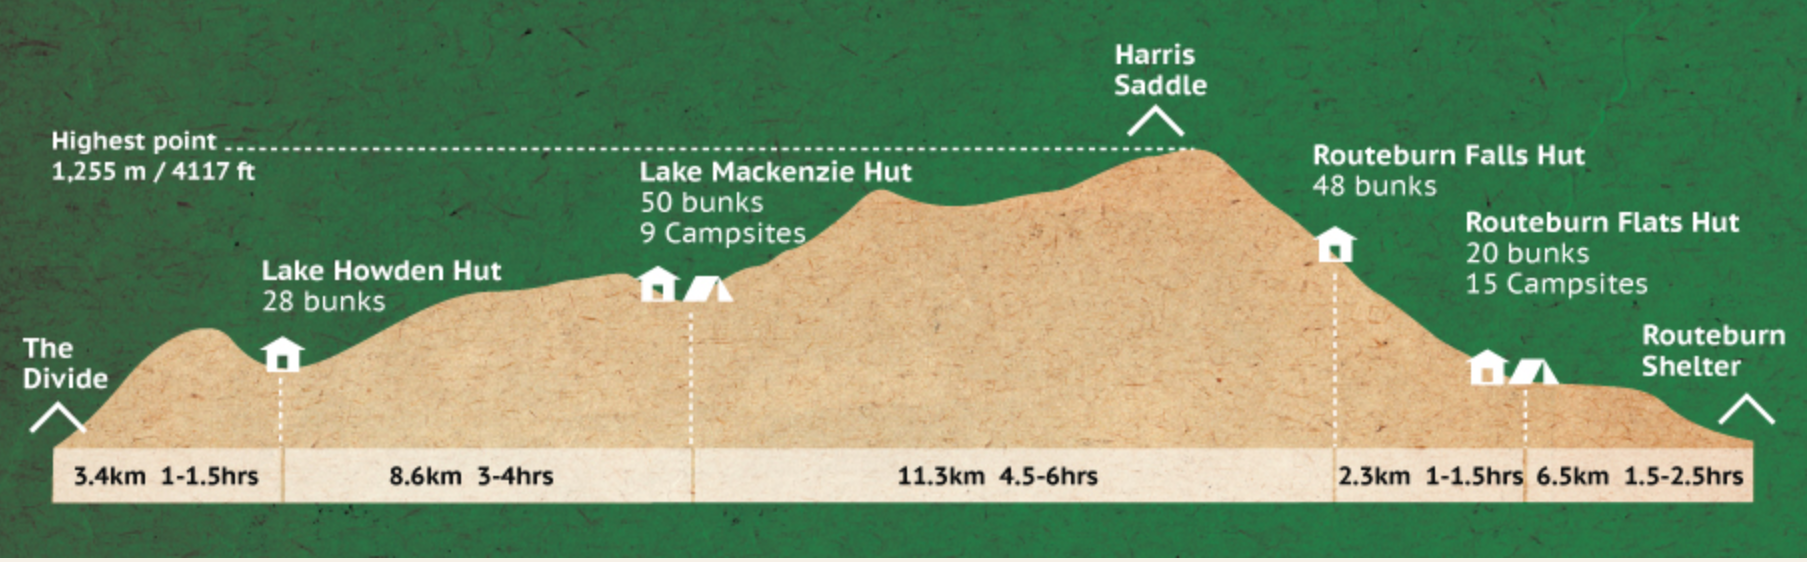
Day 1: Milford Sound Cruise and walk from the Divide –> Lake Mackenzie Hut
Day 2: Lake Mackenzie Hut –> Routeburn Falls hut
Day 3: Routeburn Falls –> Routeburn Shelter
If you’re anything like me, I do tonnes of research. I read loads of reviews on coaches, times the trek takes, and whether there will still be bunk beds if we arrive late. Therefore I will provide all information I have in case it’s useful for someone else who, like me, likes the details!
The Routeburn track is not a round route, it is one way. Therefore you cannot drive and pick your car up from the same place. This then leaves you options to either:
Get a coach to a drop off and pick up point or
Use a company that moves your car for you from the start to the end of the trail.
We chose to get the coach, as we didn’t start to rent a car until day 6 of our holiday.
You can either start at the Routeburn shelter and walk to The divide. Or you can do it the other way. As we wanted to do Milford sound first, and this is close to the divide, we did The divide to Routeburn shelter. We chose to do it in 3 days / 2 nights.
Booking the huts
It is mandatory to have booked the huts in advance. We booked 7 months in advance. We knew January would be popular. Book as soon as you know you will be doing the trek. All can be purchased on the official site doc.govt.nz.
By booking the huts, this is almost like your ‘licence’ for doing the trek. They don’t want it to be overcrowded. You must get a stamp a day before you start the trek. You can either do this at the DOC at Queenstown or Te Anu. We did this in Queenstown a day before we started the trek. However, it would have been possible to do in Te Anu as our coach made a stop here.
It is important to know you cannot book a bed, you literally have to turn up and find a space. They do not allow the huts to be over-crowded. There will never be a case where there is no space left. My partner was not looking forward to the bed situation. He likes his home comforts and not sleeping next to strangers. But even he ended up loving it as part of the experience.
Luggage
All we took were our rucksacks. We left the rest of our stuff in the QT hotel. That is where we were staying at when we return to Queenstown. If you are on a long holiday in New Zealand, I would highly recommend doing this. You do not want to be carrying around extra weight in your bag. You will be trekking with it for 3 days. Your backpack should not weigh more than 7 kg.
We had suitcases that our rucksacks were stored in during our flight to New Zealand, and this worked out very well for our entire holiday.
Transport
We booked through tracknet.net which is the official site of the coaches. I would recommend emailing them at res@tracknet.net with your dates and times, then they will send over the form to fill out. We booked this 2 months in advance. Note they will not do hotel pick up, but the pick up location is very central in Queenstown. Their site is generally very useful.
Day 1 morning: Queenstown to Milford Sound: 6:55am. (5 hour journey)
Day 1 midday: 2 hour Milford Sound Cruise (operated by Go Orange Cruises): 12:30pm
Day 1 afternoon: Milford Sound to The Divide: 2:30pm (1 hour journey) Walk the Routeburn Track.
Day 3: Routeburn Shelter to Queenstown: 10:00am or 2:00pm. (2 hour journey, we made it for the 10am one)
The cost of this in total (including cruise) was 199 NZD per person (2019). We were told there was no place to buy lunch. So, we added a packed lunch for 19 NZD per person. In the end we did see some snacks being sold on the cruise. The other choice would have been to take a packed lunch.
Conveniently we were told we could leave our backpacks on the bus while we did the Milford Sound Cruise. It was the exact same bus that was taking us to The Divide. This helped a lot.
Day 1 Routeburn Trek: Milford Sound Cruise + The Divide to Lake Mackenzie Hut
On Day 1 of the trek, we got picked up at 6:30 am. The pick-up was from a point in Queenstown City Centre. We stayed on the coach all the way to Milford sounds. The bus stops at the Te Anu stop. You can get your official Routeburn stamp here at the DOC office. We had already got our stamps in Queenstown the day before. We didn’t need to do anything here apart from a quick toilet stop.
The bus actually also goes past The Divide. We knew we’d start the trek there later in the day. A few people got off. the bus at that time to start the trek. This made me a little nervous about finding a bed, but future-me knows there was nothing to worry about.
We got to Milford Sounds at around midday, and took the cruise – what a beautiful spot in the world!! The whole bus journey was extremely scenic also. While you are in the area, it is vital you do not miss Milford Sounds. It is labelled the 8th Wonder of the Natural world and for good reason. Doing it before you start the trek is an extremely convenient way to fit it into your New Zealand Itinerary.
The same bus then took us back to the divide and we started the trek at around 3:30pm.
This day was insane, from walking on the edge of mountains with endless views of snow capped mountains. Walking past stunning Lake Howden, and walking almost through the most incredible waterfall I have ever seen in my life… wow.
Short break at Lake Howden Hut
This day trek took us about 4 hours of walking. This included a 30-minute break at the area around Howden hut. We arrived at Lake Mackenzie hut at 8pm.
Lake Mackenzie huts are very well maintained and quite a few different dorms which are in different buildings. The sleeping bed are long plastic mattresses on bunks. It is important to that you have your own sleeping bag with you and something for a pillow. Even for those people who like their luxury, this is not a bad situation for just one night. A few of the dorms were already full, but we managed to find a dorm with plenty of space. We managed to get the end of one of the long mattresses so there was no one on one of the sides. The other person was about 2 metres away on the other side.
The kitchen facilities were good, we only needed to use the stove as we took our own travel pan and freeze dried meals.
Day 2 Routeburn Track: Lake Mackenzie hut to Routeburn falls hut
Waking up at this beautiful lake and having a morning coffee was a very memorable experience. There is something about waking up in nature. Doing a trek with just a backpack always feels raw and fantastic being in the wilderness.
7:30am morning coffee at Lake Mackenzie hut
Today’s walk started through a beautiful moss covered enchanted forest. Then shortly followed by a stunning view of a gorge on one side, and snow capped mountains on the other.
This part of the trek then allows you to walk above the clouds, how amazing.
Side trip to Conical hill (1-2 hours)
On day 2 there is an optional side track to Conical Hill which will take an additional 1-2 hours. This will take you to very lord of the rings stunning mountains. There is a small scramble at the end, and if it had been raining may be quite slipping.
Arriving at Routeburn Falls Hut
Day 2 took around 8 hours including the Conical hill side track, and with stops and photos. We arrived at a beautiful waterfall at around 3:30pm and had a nice rest.
Routeburn falls hut was pretty spectacular. I was quite sure these huts would feel like ‘slumming it’. In reality where else can you stay in accomodation with views this stunning. Also these sets of huts felt very clean and great facilities.
Unlike the Lake Mackenzie huts which had long shared mattresses, the Routeburn falls hut had single bunk beds. The rucksacks nicely fit under the bottom bunk, so if you are in a 2 then you can take one side of the bunk beds.
After watching the sunset from the hut balcony we cooked our freeze dried Back Country Cuisine food. This evening we had bought a dried ice cream also). We did notice a few people had bought a small flask with some liquor in. We noted this as a great idea for next time.
Day 3 Routeburn Track: Routeburn Falls Hut to Routeburn Shelter
The final day of the trek, we were feeling slightly tired but energised by the excitement of the trek. Getting up at 6am so that we could make the 10am coach, we had our breakfast and coffee and left before most people were awake.
This day took us through forests, over swing bridges and through fields. Another beautiful day. The morning fresh air and smell of trees was wonderful.
We passed the Routeburn flats hut, stopping for some water and a snack. We made it to Routeburn shelter by 9:30am. Perfect timing to be picked up at 10am. Everyone fell asleep on the coach from tiredness. I opened my eyes at one point and saw the absolute beauty of the Glenorchy mountains, making a note that we need to visit there one day, before falling asleep again.
The Routeburn track gave us everything we wanted from a multi-day trek. We were very lucky with the weather, having not rained at all in the 3 days. We didn’t see that many people while on the trek, only now and then. This meant most of the time it felt like we had the track to ourselves.
Now we are dreaming of the next multi-day trek we can do in the beautiful wilderness. As well as cherishing these memories for our life.
Whether you want to explore the beauty of Mount Kosciuszko summit as a day hike, or if you are part of the Seven Summit challenge, this hike should be on your Australian bucket list.
Why hike Mount Kosciuszko
Mount Kosciuszko is within Kosciuszko national park, and it is part of the Snowy mountain ranges. This mountain range sits within NSW, but it is not too far from the Victoria border. It’s about 3 hours in land from the nearest coastline of Southern NSW. It will take about 5-6 hours to drive from Sydney,. Make use of this journey to stop at some lovely points along the way (e.g. Kangaroo Valley, Canberra, Cooma).
As Australia’s highest peak, Mount Kosciuszko was on my Australian bucket list as a must do activity while we are living here. The snowy mountains area is known for its beauty. It is also well renown as being a great place to snowshoe or ski in winter with great cosy pubs and accomodation. It is also famous for great hiking weather with scenery to die for in summer. I honestly think snowshoeing Mount Kosciuszko is one of the coolest things you can do in Australia!
Seven summit Challenge
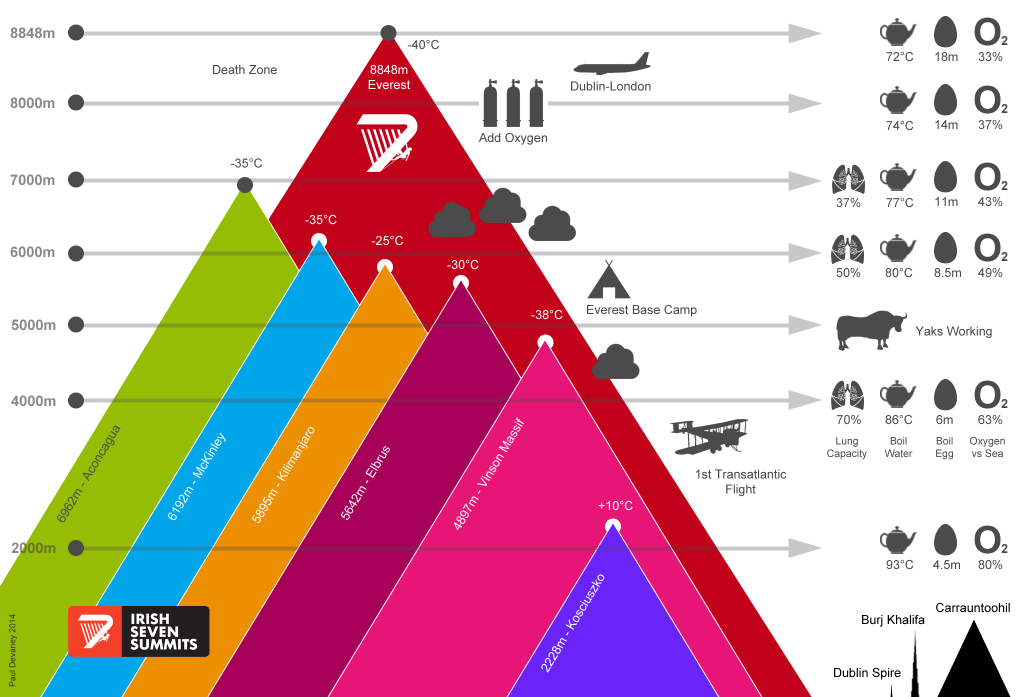
The Seven Summit challenge is to climb the highest peak in each continent around the world. For the continent of Australia, Mount Kosciuszko summit walk is the highest peak and part of the world challenge.
OK, I must confess that I did not undertake the Mount Kosciuszko summit walk as part of the Seven Summit Challenge. Nevertheless, there are numerous individuals who partake in this and you may be one of them.
Even if you may not be interested in the Seven Summit challenge, perhaps like me, you quite liked the idea that climbing Mount Koscuiszko is taking part in one of the seven summits. I like the fact now I have climbed 2 of them, having hiked Mount Kilimanjaro a few years ago.
Mount Koscuiszko is known to be the easiest summit to climb out of all. I mean look at this tiny little peak compared to the others!
Mount Koscuiszko in the summer presents a straightforward trek that accommodates individuals of all ages, including children.
Doing it in winter is what will make it a little more challenging with snowshoes, if you are looking to add some excitement to it.
How to organise the hike
During the winter, Mount Kosciuszko, Australia, has a lot of snow making it a renowned ski region in the country. It often surprises people to learn of the presence of snow in Australia. The only viable option for completing the hike during winter is by using snowshoes, and it is highly advisable to engage a guide, particularly for individuals with limited experience in trekking in severe weather conditions.
Additionally, it is important to note that the entire hike is submerged in snow during this time of the year, obscuring the footpath typically visible in the summer and increasing the risk of taking the wrong turn.
The top of the mountain can have a completely different weather pattern to sea level, and it is highly unpredictable. We used the company K7 adventures who were very professional and had the perfect guides. We chose to do the hike in July, which is peak of winter, and we booked it about 6 weeks ahead of time. They met us at Thredbo and provided the snowshoeing equipment and guided us the whole way.
The hike in total is a 13km return trip (peak is at 2228km), and if you are in no rush to complete in your fastest time then it usually takes around 5-6 hours including photo and snack stops.
Hike preparation
As with any alpine hike, before the Mount Kosciuszko summit walk, make sure to have 1-2 or even 3 days where you are able to do the hike. If the conditions are not satisfactory on the day then they will reschedule.
Luckily, the weather conditions remained clear on the day of our planned visit; but, the temperature at the top of Mount Kosciuszko was a chilling -12 degrees.
Luckily, we were well-prepared with all necessary items. Here is a comprehensive list of the items we carried in our backpacks.
Ski googles (a must in winter as the reflection is very harsh)
Suncream
Warm hat
Ski jacket
Long sleeve thermal top
Warm jacket or fleece under the ski jacket
Thermal winter leggings (or long johns and hiking trousers)
We hired the snow chains from Jindabyne
Scarf or neck gaiter
Thick gloves
1.5 litres of water
Energy bars
Change of clothes in backpack in case of rain
Thick long socks
Hiking shoes
Lunch
Snow shoes (provided by guide)
Walking poles (provided by guide)
Hot coffee in a flask (provided by guide)
The day of the Mount Kosciuszko hike
Getting to the national park
Me and my partner were staying in the town of Jindabyne, and we had picked up our snow chains from a shop in Jindabyne town centre the day before (it is mandatory to have them in the boot when entering Kosciuszko national park). Luckily our bed and breakfast helped us to have an early breakfast before 7am before leaving. Shortly after, we scrapped the ice off the car window and started our drive into Kosciuszko national park.
On route to Mount Kosciuszko at 7:30am
We arrived at Friday flat car park around 7:55am, and it was spot on for the regular shuttle bus that’s free and takes you to Thredbo village. It was a Friday but not during the school holidays, and the car park was pretty empty when we got there, with heaps of space available (I was a bit worried about this).
Starting the hike
We met our guide from K7 at the Gravity Demo shop at 8:15am, got our snowshoes and checked equipment and then the ski chair lift passes. It was only me and my partner and the guide which made it more like a private tour! Starting the hike by taking the chair lift was a great experience, as was wondering around Thredbo which had a great ski style atmosphere.
We got the chair lift up to the start of the hike, and then began walking the Mount Kosciuszko summit walk!
It took a while to get used to the snowshoes, which are large structures that clasp onto the hiking shoes. Although they are a must as they definitely made walking in the snow easier as you do not sink.
The hike started off quite easy, and the snow was flattened. It was still possible in some places to see the path. We happily chatted away with the guide during this time and enjoyed the beautiful blue sky. We saw a few other people at first, but mostly it was only the three of us.
Bear in mind the whole Mount Kosciuszko hike takes around 5-6 hours, so about 1 hour into the hike you are already quite high up. For us at that point, that is where the wind started and even when we stopped for lunch we had to hide behind a rock due to the wind. The 1 hour up to the peak was a lot more challenging and due to the wind we were pretty much in silence and focused on the hike! But still focused enough to notice the beautiful scenery everywhere – this mountain is completely stunning and make sure to take it all in!
Getting to the Mount Kosciuszko summit
The last 20 minutes up to the top was the most challenging, up a fairly steep hill in the very strong wind. Although once we made it to the Mount Kosciuszko summit it was suddenly wind free and very serene. What a beautiful view at the top and a great feeling of achievement.
The way down was a faster and bit more relaxed, though always a bit more harder on the legs. We past through the most beautiful rocks in snow and I got to take some stunning photos.
At around 2:15pm we made it back to the top of the ski lift and said goodbye to our guide. Before going back down we made sure to have food in Eagles Nestle, Australia’s highest restaurant at 1937M. This place is a must visit while you are in the area and great for some warm salty food and hot chocolate with cream and marshmellows!
Hot chocolate and cream at Eagles Nest
Where to stay
We stayed at the most cosy bed and breakfast a short walk from Jindabyne town centre called Troldhaugen. The rooms were very cosy with a Scottish winter theme that gave a ski lodge feel. The hosts were extremely friendly and helpful. There was also a delicious breakfast was included which was great.
What not to miss while in the area
If you don’t know the history of the area it is worth reading about the Australian poet Banjo Paterson, as you will notice quite a few references in the area. He was also the person who authored ‘waltzing Matilda’ which is one of the most iconic songs in Australia.
While staying in Jindabyne don’t miss a walk around the most beautiful lake. I was shocked at how stunning this lake was, it really was like being in Queenstown again!
The other must do, that ended up being our go to for pre dinner drinks was Banjo Paterson Inn. This is also a bed and breakfast which is right next to the lake. They also do great pub grub food, which is perfect after a day of walking!
We also enjoyed a meal in the Mexican Cocina Taqueria, and we did visit the Rydges for a meal but it was the atmosphere was a bit dull. In the town centre there are some nice cafes and it is worth a trip into the tourist visitor office!
If I could describe South Island New Zealand in one word, it would be magical. Perhaps this association is due to its connection with the “Lord of The Rings,” but setting that aside, the region is renowned for being one of the cleanest, purest, and most naturally beautiful places in the world.
It took me a long time to visit the South Island New Zealand, as I had already been to the North Island during a gap year. Now, living in Sydney, the South Island is only a 3-hour flight away, so it was very high on the priority list while we are living on this side of the world.
Our itinerary combined a good mix of activity and relaxation. We also had the chance to visit some of the must-see places that are at the top of most people’s lists!
Time of year
We chose to go at the end of January, which in New Zealand is the height of summer. Mainly because we wanted a higher chance of good weather, and one of the main activities we wanted to do was a multi-day independent hike. Summer in the South Island New Zealand is not like summer in Australia. It is still an average of low 20s during the day. We did not get a single day of rain during this time, but I understand this is very unusual! Therefore for a trip where you want sunshine, less chance of rain, good weather for trekking and eating and drinking outside then I recommend the summer, late spring or early autumn is for you.
The other great point about summer is that it doesn’t get dark until after 9pm, this was great for us while doing the Routeburn trek, as we started this slightly later in the day after going on a Milford Sound cruise.
Saying that though, I’ve heard that winter offers a totally different vibe with snow-capped mountains, cozy bars serving mulled wine, breathtaking scenery, and skiing, which sounds equally amazing. However, the treks may be off-limits, especially the multi-day treks (since there’s no ranger during this time, and people go at their own risk, so it’s only for the most experienced). It still sounds like an awesome experience, just a different one.
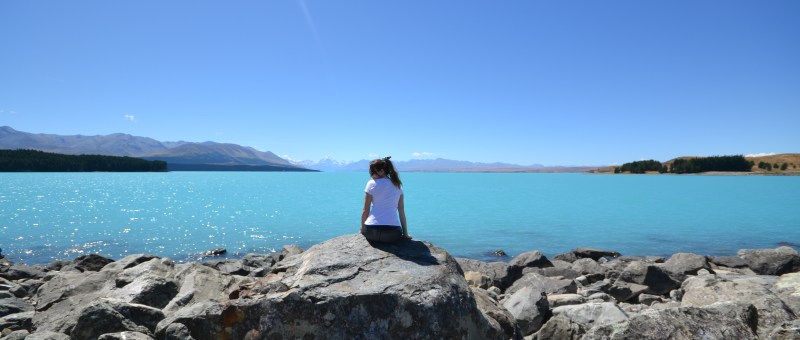
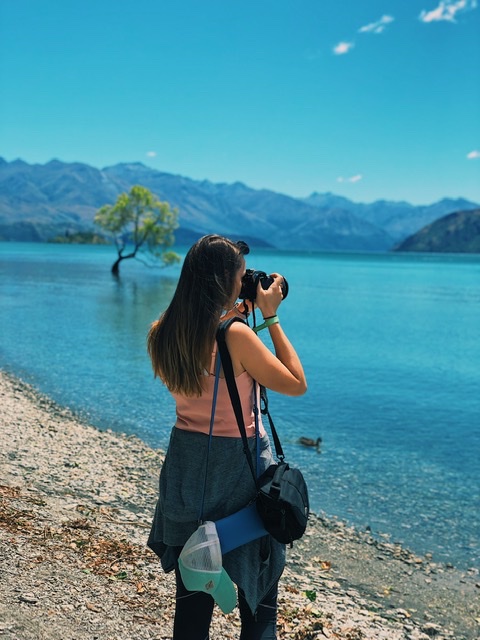
Me taking too many photos at Lake Wanaka 😅
Itinerary for an unforgettable South Island New Zealand trip
Follow this itinerary or get inspiration if you want to see the Best of South island New Zealand and also incorporate an awe-inspiring multi day trek.
Day 1: Fly into Queenstown
Day 2: Queenstown
Day 3: Routeburn Trek
Day 4: Routeburn Trek
Day 5: Queenstown
Day 6: Wanaka
Day 7: Wanaka
Day 8: Twizel
Day 9: Mount Cook
Day 10: Fly back from Christchurch
Days 1-3: Queenstown
We flew from Sydney and arrived in Queenstown early afternoon. We picked up a taxi from the airport, and it was a short taxi ride into the town.
Queenstown really is a great place. It does not feel commercialised, as there aren’t any high rises, and therefore it has a small town ski village feel. We found everyone super friendly also! We found that we would go into a shop and be caught up for 30 mins as the staff would just talk to you like your best friends. It seems to incorporate the chilled backpacker vibe, with a high end plus super eco friendly town.
Stay at The Waterfront in Queenstown
This time round stayed at The Waterfront, which have amazing balcony views of the lake. It is really just beautiful. It is only a 5 minute walk to the Main Town Pier and centre, great location to explore the town.
Must do’s in Queenstown:
You can’t miss it, but seriously, Ferg burger has turned into a must-visit for tourists. And they’re so damn tasty.
Picture yourself chilling in the hot pool at Onsen hot pool, soaking in the stunning view of the valley. Just make sure you book well in advance – we’re talking months ahead! They offer a pick up service in case you haven’t got a hire car.
For great cocktails, friendly staff and breathtaking views visit Red’s bar at QT. !
Hang out at the main town pier. Grab a leisurely lunch or dinner, or enjoy a glass of wine at one of the restaurants (like Ivy & Lola’s) while taking in the stunning view of the serene lake and towering mountains. It’s the perfect spot for a meal with great vibes and even greater views. My partner and I still reminisce about this place.
Check out all the cool activewear shops. When you’re in Queenstown, you gotta rock that Kathmandu or Macpac all day!
The Skyline is super popular, but we decided to skip it because it seemed too touristy. We knew we’d get breathtaking views on the trek anyway. However, if you’re not up for a trek, this could be a great option to catch some spectacular views.
Queenstown is a must visit town in South Island New Zealand.
Days 3-5: Routeburn trek (including Milford Sounds visit)
The incredible Routeburn trek still holds a special place in my heart. There’s so much to say about it that I’ve written a separate post. Check it out for a guide on doing the 3-day, 2-night Routeburn trek and visiting Milford Sound here: Ultimate Guide to Routeburn Trek.
Day 5: Back to Queenstown
Back in Queenstown after the trek, I found myself falling even more in love with the town when we stayed at the QT, a fabulous hotel. If you have done a multi-day trek, staying at somewhere a bit of luxury afterwards is a great reward!
Accomodation: QT in Queenstown
This time in Queenstown, we indulged in the exquisite luxury of the QT hotel after two nights in humble huts. The QT is truly a superb hotel in Queenstown, offering a great experience year round. The beautifully decorated rooms with charming balconies have a delightful ski-lodge ambiance, creating a truly enchanting retreat.
Days 6-8: The wonders of Wanaka
At this point we picked up our hire car and started the road trip from Queenstown to Wanaka, through the beautiful Central Otago region. There are many stops on route, we stopped at Cardrona Distillery The Source Gin which is definitely worth a visit!
Once we reached Wanaka, we settled into our accomodation and found the finest bars along the waterfront. Be sure not to overlook the Wanaka tree and make sure to visit Rippon winery for stunning vistas! Continue reading for the top suggestions in Wanaka. We stayed in Lake Wanaka Lodge which was great value for somewhere clean, comfortable and walkable to town. Check out Whare Kae Lodge & Chalet if you are after ultra luxury.
Must do’s in Wanaka
For that quintessential New Zealand wine meets stunning postcard perfect views, head to Rippon winery. This is honestly has to be the most beautiful winery in the world. Make sure to book ahead for the tasting.
A not to be missed view, spend time skimming stones and taking endless photos of ‘that Wanaka tree’.
Have a few fresh ginger beers and listen to great live music in the courtyard of Cork bar.
For views and an awesome higgledy-piggledy bar with a great name head to La La Land.
For a magical one day trek plan to do Roy Peak.
Eat at Kika restaurant for beautiful fine dining food. Garden Ramsay also agrees!
That Wanaka tree
La La Land
Cork bar
Rippon Winery
If you like wineries check out the Australia wine regions in Mudgee and Hunter Valley.
Days 8-10: Mount Cook South Island New Zealand region
Leaving the iconic views for last, we wrapped up our trip in the breathtaking Mount Cook South Island area. We spent one night in Twizel and another right next to the Mount Cook walking tracks. Keep reading for accommodation details.
Wanaka to Twizel was under 2 hour drive and we made use of this day by visiting the ultra blue Lake Pukaki. I had always wondered if the water was really that blue, and yes on a clear sunny day it truly is! We parked at Alpine Salmon Store, we weren’t so much interested in the Salmon (though I’m sure its extremely fresh) but they had parking and a shop where we got a coffee and ice cream. This spot is a great place to have a lie down on the rocks and soak up some rays (with factor 50+ of course).
Rocks at Lake Pukaki
Mount Cook and Lake Pukaki
Taking photos at Lake Pukaki
Ice cream from the cafe at Lake Pukaki
We then headed back to our accomodation for the evening which was Heartland Lodge, a lovely homely B&B with an awesome breakfast.
On the second day in the Mount Cook region, we commenced our journey to our next accomodation in Mount Cook National Park. Our road trip began by passing a lavender farm offering Lavender coffee or ice cream, and enjoying the iconic road and mountain vista at Tapataia Mahaka Peter’s Lookout.
NZ Alpine Lavender
Road views of Mount Cook
We then continued to our next accomodation, the Hermitage Hotel. This hotel is a big hotel and the rooms are quite basic, but what makes this hotel a stand out is the bar with full glass view and also the location. The location is sat in the national park and only 5 minutes to Mount Cook airport (for scenic flights) and the famous walks.
Glacier landing at Mount Cook
As soon as we checked into our hotel, it was time for a scenic helicopter ride that we had booked for 13:30. We then drove to the tiny Mount Cook airport (pick-up service is also available). We opted for the Tasman Taster experience through Inflite Experiences, and although the check-in process took some time, the opportunity to land at a glacier was truly magical. It’s important to note that you may not be able to sit in the front or next to a window in the helicopter. In our case, the other girl and I had the opportunity to sit in the front as we were the lightest, while the guys had to stay at the back to ensure even weight distribution.
Weather-wise, during the height of summer, it felt a bit chilly on the glacier, but we didn’t need a ski jacket or thick trousers. I was still wearing 3/4 leggings, a t-shirt, shirt, fleece, and a thin scarf, and this was adequate. You are only on the glacier for 5-10 minutes, so it’s not enough time to feel the cold. If you are like me, you will be running around in the snow anyway :).
Hooker Valley Track, one of South Island New Zealand’s best
After landing, we drove straight to the Hooker Valley track, arriving there around 3 pm. The Hooker Valley track is known to offer excellent value. You don’t have to work very hard (the walk is easy) to be rewarded with incredible views. This track should be included in any itinerary for a trip to the South Island of New Zealand.
The day finished with having a drink and dinner at the Hermitage Hotel hotel, and wow that bar has stunning views. We were also extremely fortunate to witness a pink sunset going behind the Mount Cook mountains that evening, what a spectacular day!
The following morning we started our drive to Christchurch airport, stopping at Lake Tekapo on route. This lake is equally as blue, and has a famous Church of the Good Shepherd, which is like something out of a movie. However it was a lot busier than Lake Pukaki, so not really a place that you can chill out.
Our drove continued, with a bit of traffic and some roadworks. However we were lucky enough to be in high spirits dreaming of the magical 10 days we’d had in South Island New Zealand, and wondering when we will get the chance to go back.
A place full of scenic landscape, good food and wine, Mudgee is the perfect weekend getaway from Sydney and a winter wine weekend. We decided to go on a Winter Weekend in Mudgee after reading about it a while ago, and finding an Airbnb that looked so unique it could have been on Grand Designs.
Winter weekend in Mudgee
We did our first trip Mudgee in a winter weekend in July, with the intention of making the most of the cosy side of Mudgee, that they do so well! You can’t ask for a more well set up place for a winter wine weekend, with fireplaces roaring in all pubs and wineries! The sun still strong enough to sit outside during the day time if it is a sunny weekend! It is also such a picturesque area, it is a beautiful place to take some travel photography.
Accomodationfor the perfect Winter weekend
Our Airbnb called Strikes 2 was perfectly set up on the top of a hill, with an amazing viewing deck and floor to ceiling windows in the lounge. The only other house we could see was the other cottage that can be rented out. I would say that Strikes are are definitely in the luxury Airbnb business, and they do it so well! The accomodation is so unique and sticks out of the ground on stilts. It is the perfect place to have a chilled coffee in the morning whilst cooking sausages on the Weber grill on the veranda in the morning, and having a glass of wine watching the sunset in the evening. An alternative great place to stay for a winter weekend in Mudgee in the town centre is Perry Street hotel, within walking distance of many restaurants and pubs.
Mobility
Strikes is about a 15 minute drive from the centre, and therefore need to get a taxi to the centre and wineries if you are drinking. The taxi service is 24/7 and very efficient. You can just call 131008 at any point while you are in Mudgee to order.
The Weekend Itinerary
Friday
On the Friday night we were after pub grub and Kelly’s Irish bar in Mudgee city centre defiantly delivered on this, but it was time to leave when an Elvis impersonator turned up. We then made our way to Roths wine bar, which is the oldest wine bar in NSW! There was an amazing singer and guitarist, and we enjoyed the rest of the evening sitting in the indoor-outdoor garden, surrounded by fairy lights and next to the fire. Roth’s is an absolute must bar to visit during any Winter Weekend in Mudgee trip.
Saturday
On the Saturday we joined a half day tour by Mudgee Explorer Tours. They picked us up directly from Strikes and took us to three wineries. Our favourite of these was 1838 which also grow their own olives.
We then got dropped off at Lowes winery so we could spend the afternoon there. Lowes winery has great views and you can order a lunch time platter until 3pm. It seems like a very popular place to hang out, and you can definitely see why!
Sunday
On the Sunday we went to Pipeclay Pumphouse for lunch, wow the food was amazing! The view from Pipeclay Pumphouse was beautiful, and we could imagine a beautiful place to spend a lazy afternoon.
This is a guide based on my own recent experience on how to achieve Hilton Honors Gold Status by using their Status Match feature.
Eight months ago I wasn’t even collecting any hotel status or loyalty, I was mainly using hotel.com or booking.com to book all holidays. This all changed when we decided to have a fully splash-out kind of honeymoon (the best kind). However we soon realised how expensive even breakfast is in these hotels, so I started to research our options.
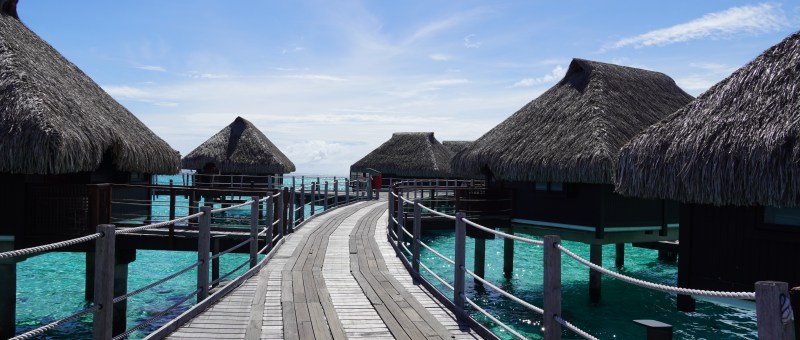
Our honeymoon destinations were New Zealand, Moorea and Bora Bora, the later two being in the super duper Honeymoon capital French Polynesia. In French Polynesia there are a wide range of known hotel chains. However, these are not your bog standard city corporate Hilton or Marriott, these are overwater tropical heaven. You do not even recognise the hotels as their brand. After doing some research and seeing the benefit of staying in the same brand for our honeymoon we decided to stick with Hilton (which includes Conrad brand).
One main advantage of being Gold Status with Hilton Honors is that you automatically get free breakfast. It sounds crazy but if we had paid for breakfast during our honeymoon, that alone would have cost over $1000!
Keep reading on how to get Hilton Honors gold status without needing to spend much to get there.
Step 1: Get gold status loyalty with another hotel brand
Luckily enough, I already had 7 nights with Novotel after a work trip earlier in the year. Novotel is part of Accor group. To reach gold status with Accor requires 30 status nights. However this can actually be achieved without completing all of the nights!
Get 20 free nights with AccorPlus
Most of the time there is an offer on with Accor to sign up for AccorPlus. At the time there was an offer for Accor Plus Traveller Membership for 4000 Accor live points. I had some points with Qatar that were about to expire and saw I could transfer these to Accor. That gave me enough to get this membership without spending a penny.
Screenshot
As you can see with Accor Plus – you get 20 free bonus nights. I do not know any other hotel that does this and this is why Accor was my choice.
As mentioned, in order to get gold status with Accor you need 30 nights. It’s also important to know that Accor has strict timing to achieve the 30 nights, this has to be within the Jan-Dec of the year. At the end of each year status nights get wiped and you have to start collecting again from scratch. The following year your loyalty will be whatever you achieved in the previous year.
I had 3 nights left to reach 30 nights. Two of these nights we completed by booking a local Ibis Budget for under $100 (note yes you do have to check in and out in person). Some Ibis Budget do not count towards Accor status nights, so make sure to check this in the app before hand (when looking at the hotel check for the All Accor tick). The last night we splashed out for a nice end of year night in a city hotel that was on Accor red hot rooms.
Gold status achieved! I don’t want to miss the great things about Accor gold itself: good discount on the hotel restaurants, red hot room deals, and free upgrades if vacancies.
To summarise gold status with Accor:
30 nights are required to be completed in the calendar year to achieve gold.
If you achieve gold status in 2024, you will have gold status until the end of 2025.
Step 2: Accor status match with Hilton
Once you achieve gold with another hotel brand, you can then apply for that status match challenge with Hilton. Note that: you only can do this once in your lifetime so choose wisely (e.g. I did it for my honeymoon), also the status match is only for 90 days so time it correctly.
There is normally a deal as well, that if you stay with Hilton for over 8 nights during those 90 days then you can keep your Gold status for at least a year, and 14 nights you get Platinum status for at least a year.
You will notice that there is no option in the download for Accor, but there is an option for ‘other’. I selected this option and wrote All Accor. You also need to upload the evidence of a recent stay that you have paid for with that hotel brand and proof of your status. Now it is all in their hands, they have no commitment to approve everything.
My status match got approved within 10 days, which I believe is about average timing. Note that as Accor is not in the list, I suspect they may be a bit more picky on this. As I am based in Australia I think this probably helped as there is less loyalty to the Hilton Honours brand here than there would be in the US.
Now once this gets approved all you need to think is….was all of this worth it?
The Answer: Yes…yes it was 🙂
Oh and we ended up with Platinum status until March 2026. So where to next!
Bora Bora Conrad Hotel
Dive into my blog post all about an incredible honeymoon in Bora Bora, featuring tips on accommodations and tips for your vacation.
For First Timers to Sydney Siders, this list will show you give you insight into some of the best things to do in Sydney. Use this list to help plan out your holiday or just a weekend!
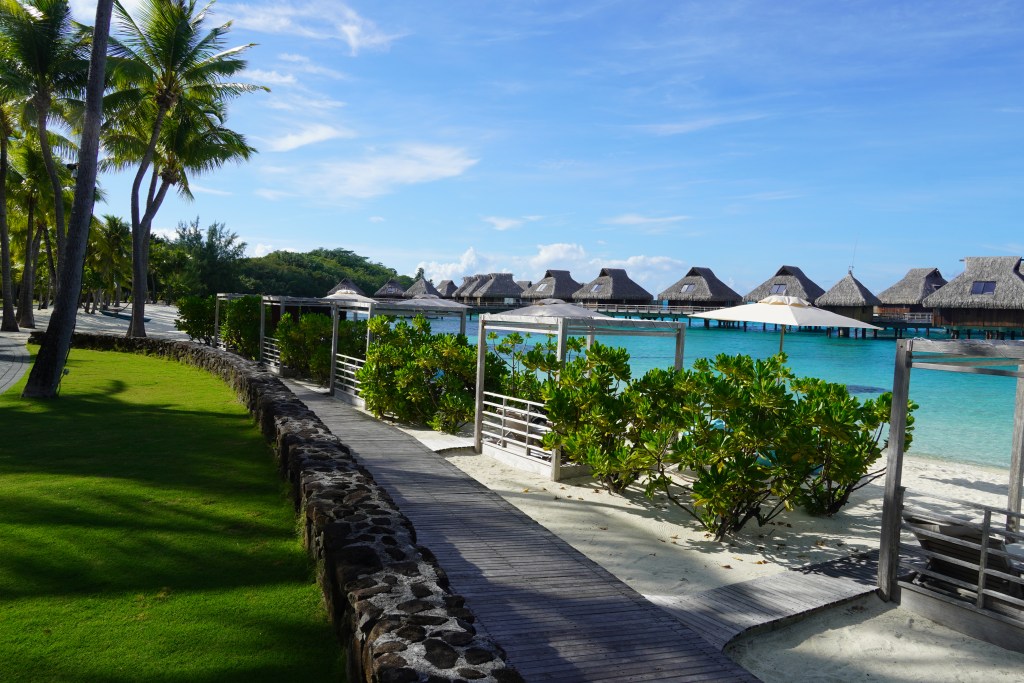
Enjoy all Sydney has to offer
Sydney is one of the most beautiful, vibrant cities in the world. No matter what time of year you visit, there will always be something going on. Keep reading to find out the BEST things to do in Sydney. If you are only visiting for a short time, I’m sure you will have time for a couple of them.
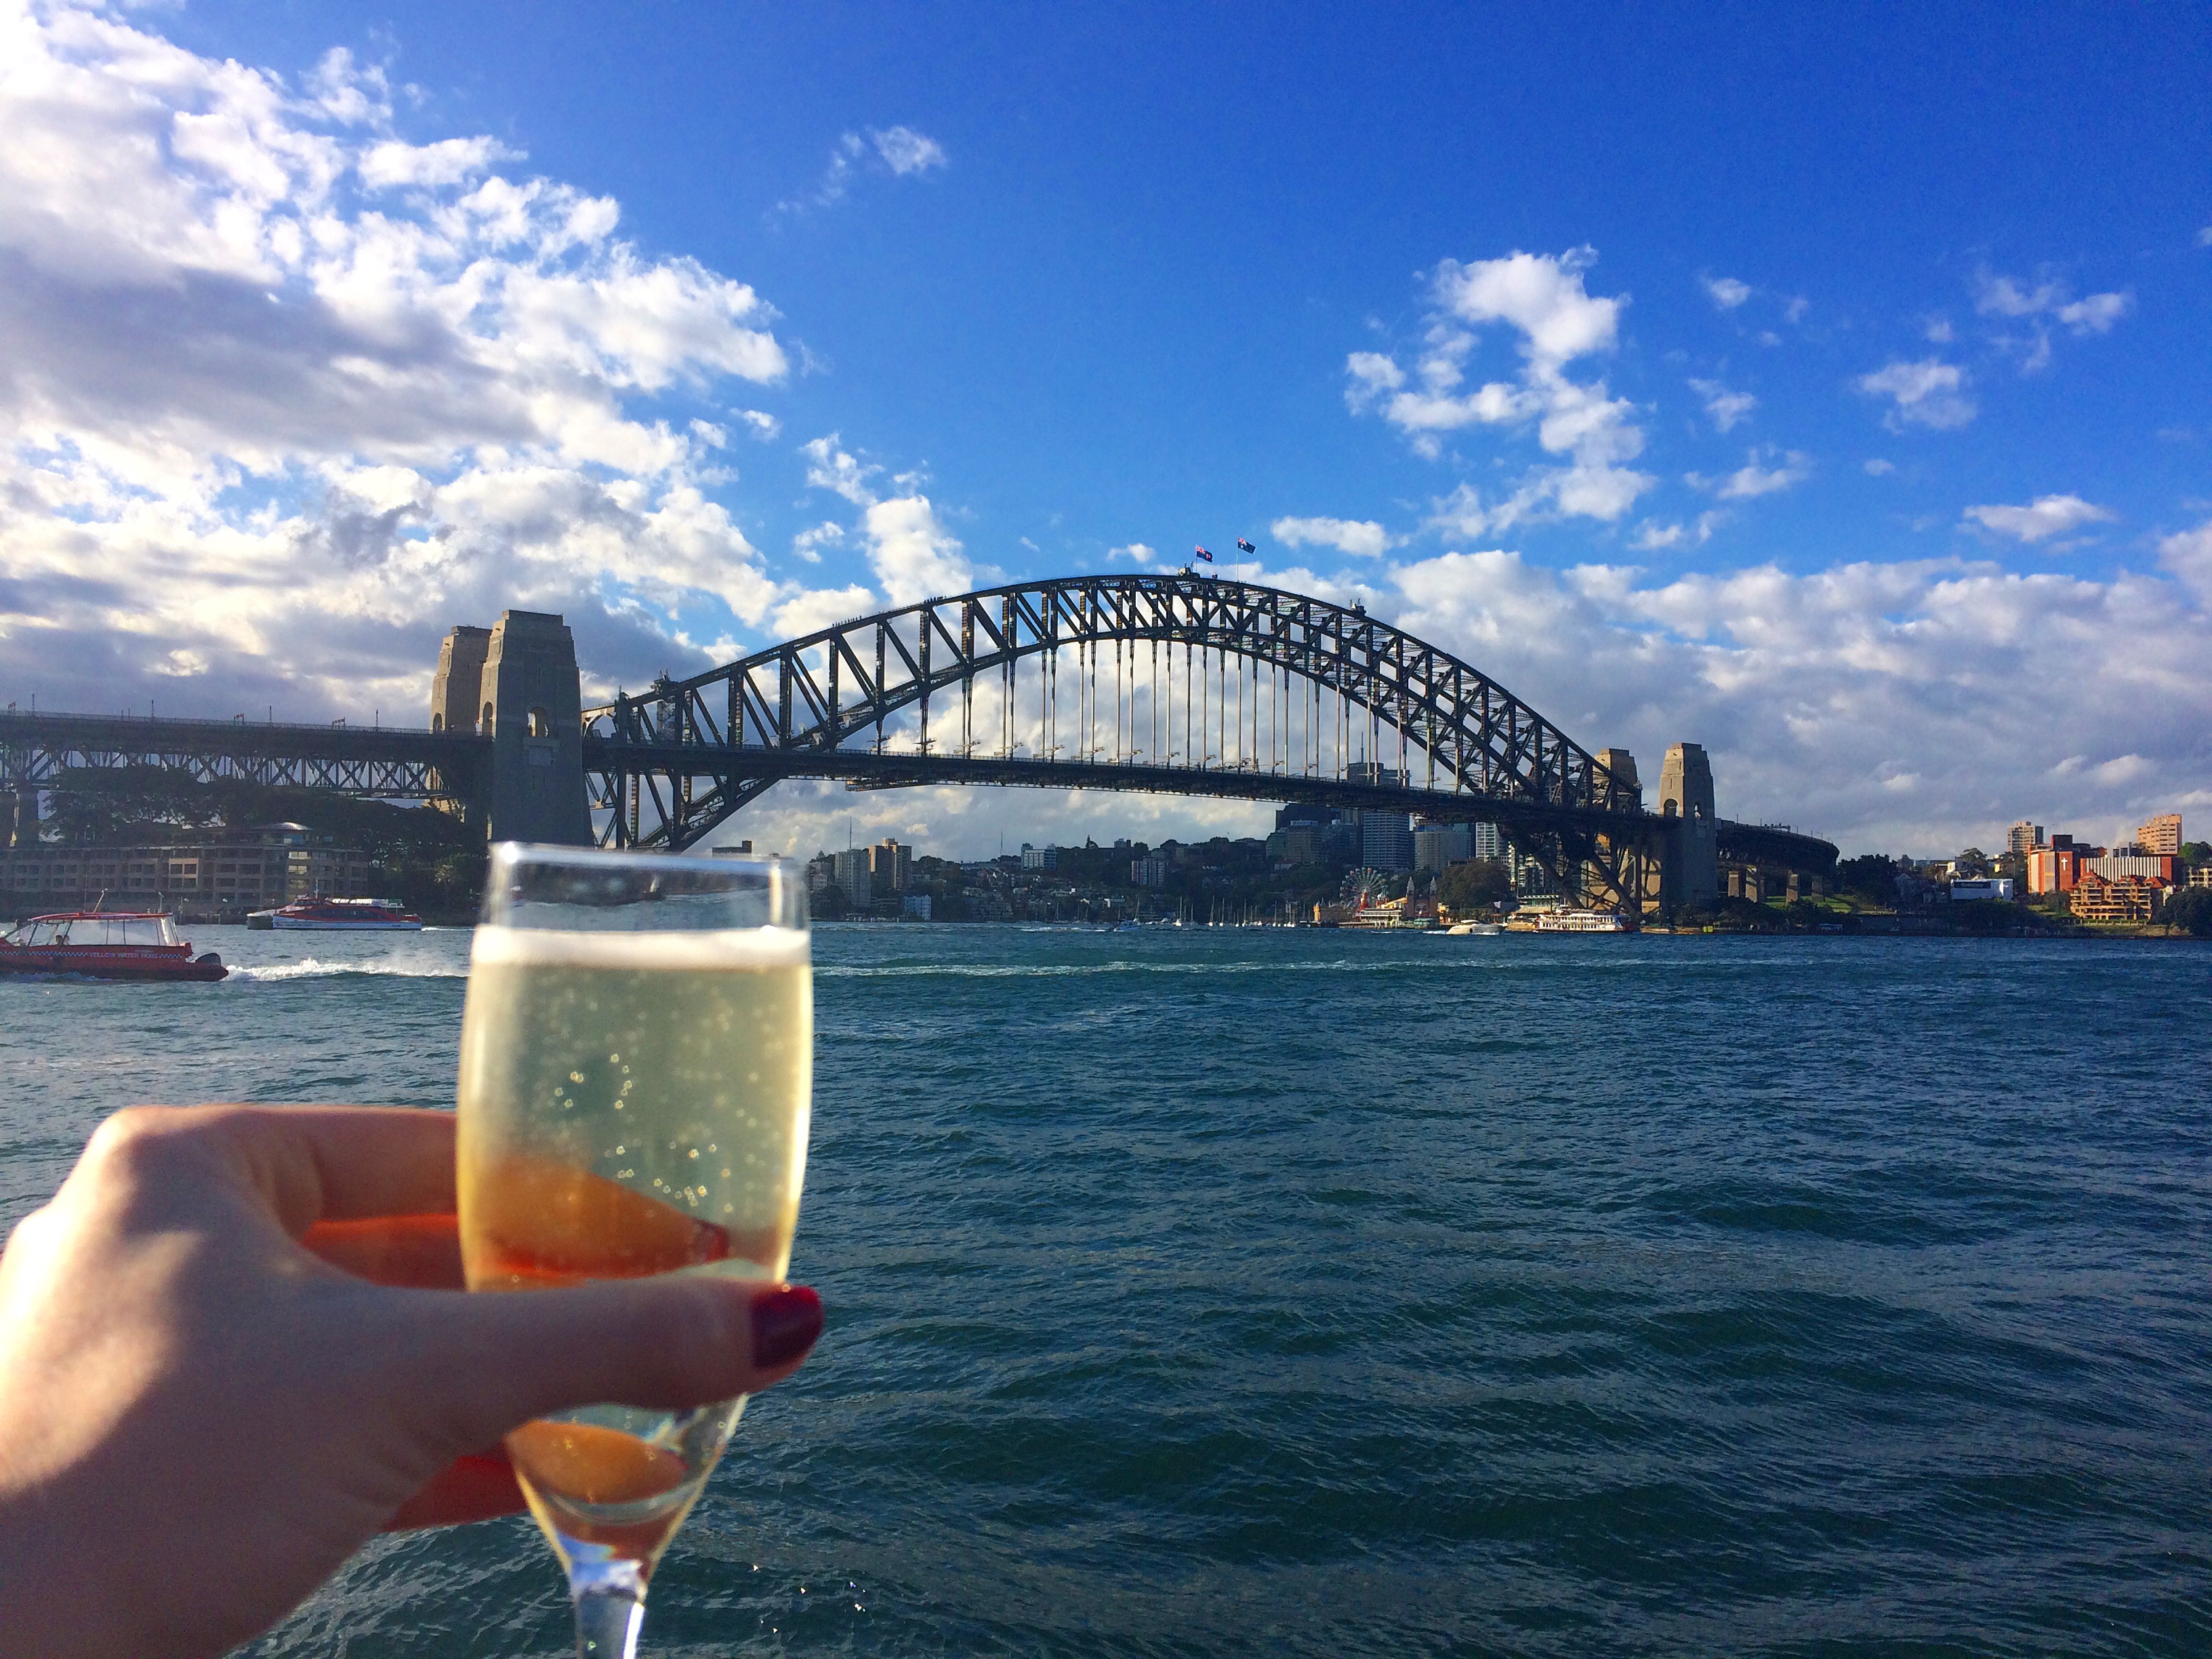
1. Have a drink at Squires Landing
Number one is a really low key activity but with an epic outcome (in my opinion). If you only have time to go to one pub, this is the one. Squires Landing – restaurant and Brewhouse sits in Circular Quay harbour near the rock. It sits on the end of a wharf and in the middle of the Harbour Bridge and the Opera House. What this means is the view is epic!
Spend as much or as little time here. Minimum can just be one beer or ginger beer (it is a brewery as well!). Maximum you can get a great pub grub meal and stay for as long as you like! I would not recommend booking, as then you sit upstairs, which it isn’t quite as good as the outdoor atmosphere you get downstairs. So just turn up and hope the queue isn’t too long!
This pub is a real all rounder. In winter they have heaters in the huge outdoor space, and every Saturday they have amazing live music. In summer the vibe is amazing, and this place is great daytime and nighttime.
So grab a drink, get an outdoor table and take it all in….this is really one of the best things to do in Sydney.
Squires Landing
For an alternative bar with similar vibes and great views, try the Opera Bar and Kitchen.
2. Walk around Sydney CBD
Sydney is a beautiful city and luckily it is a very walkable city. Join a free walking tour to learn about the history, or take your time and walk your own path.
A good route to take would be Mrs Macquarie’s Chair –> Botanical Gardens –> Circular Quay –> the Rocks –> Town Hall –> Darling Harbour –> Barangaroo
Darling Harbour
3. Bondi to Coogee Walk
I almost have to apologise for putting this on the list, as it is so obvious. However I wanted this to be a full list and, well, this walk is famous for a reason. This will be on 99% of lists that exists of the best things to do in Sydney.
Seeing Bondi Beach is a must when in Sydney, and walking on the Bondi to Coogee walking path next to the ocean to another amazing beach after beach makes for the perfect afternoon spent.
Bondi Beach and Coogee do not have train stops. Get a train to Bondi Junction and then straight on a bus to Bondi Beach. The bus station is within the train station, just follow the signs. Grab an avo on toast brunch or a smoothie at one of the many health cafes on Bondi Beach, and then start the walk. The walk starts just behind the Bondi Icebergs (that famous sea pool photo). The walk will take you from beach to beach. Beautiful white sand and drink stops on the way (e.g. Tamarama Beach Kiosk). If it summer then make this a full day trip and go swimming at each beach!
On average if you walk and do not stop it would take under 2 hours. If it is a hot day then add another 30 minutes. For photos and potential swim stops then add on more time!
At the end of the walk grab a cocktail at the beautiful Coogee Pavilion Rooftop bar, before getting a bus back to Bondi Junction.
Route: Bondi Beach –> Tamarama Beach –> Bronte Beach –> Clovelly beach –> Gordens Bay –> Coogee beach. Can be done the other way around also.
All beaches are sand beach apart from Clovelly beach, which is a cool concrete beach and great for swimming as it is a bay. Gordens bay has a snorkelling trail. Most of the beaches have an enclosed sea pool which helps to avoid waves or those who fear sharks.
Gordens Bay
4. A day at Manly Beach
OK another beach, but this is what Australia is great for! Manly beach has a very different vibe to Bondi . If you have time then it is worth going to both. A day at Manly beach starts with taking a 20 minute ferry from Circular Quay to Manly Wharf, then the rest of the day is up to you!
The beach on the Manly Wharf side is a flat water beach great for chilling or paddle boarding. Walk through the small beach town of Manly (grab an ice cream on the way) and you’ll end up reaching the Pine tree lined Manly beach. The beach has a street full of bars and restaurants. The day is yours to choose from if you want to dine and drink, sunbathe and swim or even take up a lesson in surfing!
Tip: keep walking from Manly Beach up to Shelly beach for a lovely short walk and maybe even a lizard on the way!
Manly Beach
5. Take a ferry to Watson Bay
Taking a ferry to Watson Bay from Circular Quay is an experience in itself for the beautiful views. Then once you arrive on Watsons Bay you have a beautiful area to explore along with Sydneys most iconic fish and chips!
Watson Bay Boutique Hotel
Best things to do in Watson Bay:
Have iconic fish and chips near Watson Bay ferry terminal
Have a cocktail at Watson Bay Boutique hotel
Walk to the lighthouse and take in all of the views
Sunbathe and swim at Camp Cove beach
6. High Tea at Queen Victoria Building
OK if you are from England then this may not be a novelty, for anyone else or those who love high teas as much as I do then the Queen Victoria Building (QVB) is THE place to go. It is worth visiting this building even if you don’t plan to eat, this is a beautiful grand building from the Victorian age and wouldn’t look out of place in London.
Turn up and choose your cafe (most on the middle floor will serve a high tea), or book into the The Tea Room for the full experience.
7. Day trip to Blue Mountains
For a day into nature and only just over an hour from Sydney CBD, the Blue Mountains is one of the most beautiful National Parks in the whole of Australia. One thing you might notice when coming to Australia is that as soon as you are outside of the city, it feels very untouched. This is one of the reasons that I love it here so much, nature has been left to be nature. The blue mountains is 267,954 hectares of land, and 10 ties older than the Grand Canyon.
Visit for fresh air, dramatic peaks, walks and waterfalls.
If staying in Sydney CBD, you can either book an organised day trip or hop on an easy 2 hour train journey from Sydney CBD to either Katoomba or Leura for a small town with access to many walking paths.
Blue mountains is great for walking year round. In the summer the mountains can provide some much needed relief from the hot city days, and in the winter it is the perfect time to put on a coat and hat and enjoy a long walk.
Blue Mountains in Winter
8. Have a picnic in Wendy’s Secret Garden
Take a ferry or train to Milsons Point, or walk over the Harbour Bridge to North Sydney. One you reach Luna Park you can walk through it in order to get to Lavender Bay. Take in the views over the water and keep walking until you find the stairs in the middle of the Bay. Walk up the stairs to the beautiful spot of Wendy’s Secret Garden. Then find the grass area with epic views over Sydney Harbour bridge.
Take a rug, some food and drink and have a beautiful time.
Wendy’s Secret Garden
Alternative picnic spot in the city is Botanical Gardens near the Opera house which is also a stunning place to visit and hang out.
9. Dine in a iconic restaurant
There is nothing more memorable than great food and epic views of Sydney, and if you are planning to ‘splash out’ then Sydney has many options. Here are a few of the most well known, best views (and most expensive), make sure to book well ahead!
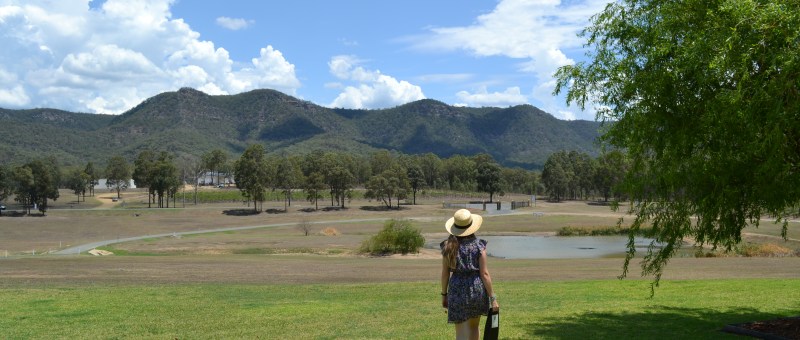
Hunter Valley is the oldest wine region in Australia, and a great option for a weekend getaway from Sydney. Each time we visit there, we have a completely different experience and, with over 150 wineries in Hunter Valley, it will feel like a new place each time.
If it is your first time in Hunter you may want to take a wine tour or the hop on hop off (we have done this and highly recommend it). However, if you know exactly want wineries in Hunter Valley you would like to visit then you can take taxis around (Uber is normally available in the hunter).
The wineries are so diverse, from Australian farm vibes to Tuscany vibes, from commercial to homely. You can truly tailor your experience wondering around this wine rich beautiful green valley however you would like to.
Here is a list of my recommended Must Visit Wineries in Hunter Valley.
1. Iron Gate Estate
I love a good winery that is also very picturesque and transports you to a different place. Iron Gate Estate is the winery that will make it look like you have visited Tuscany in Italy, and having an amazing European holiday!
2. Leogate Estate
Leogate Estate will provide you a classy, vintage experience with a touch of elegance. The outside is stunning, with white Grecian architecture and fountains. To top it all up the views of the Brokenback Ranges that surround the estate are second to none.
Brokenwood Wines
This stunning wooden designed cellar door, Brokenwood Wines is a must visit in the Hunter. A more commercial wine now, this is a cellar door where you have many options. From private tastings, cheese boards, to trying wine at your own leisure on the expansive terrace, this is a great place to spend a couple of hours.
4. Mira Wines
For a more personalised wine tasting experience with Greek inspiration, Mira Wines is a beautiful vineyard owed by a lovely Greek-Australian family. The wine tasting experience includes olives, cheese and beautiful views. The hero of Mira Wines is the limoncello, which is a lovely change to all of the wine in Hunter Vally!
While you are here, it is easy to visit Hanging Tree wines which is walkable next door.
5. Hanging Tree Wines
For a boho, boutique, rustique themed winery, Hanging Tree Wines is a beautiful place to hang out and drink some wine! Just a short walk from Mira Wines, it is worth visiting both while in this area.